Monday, December 28, 2009

It's good to have friends with whom you can share leftovers.

This wisdom today brought to you by too many so-so dumplings (not the Asian kind) with a yummy turkey soup and a Native American med student with a great metabolism who is hopefully bringing dessert.

Chocolate Espresso Snowcaps

If you like coffee, and have a penchant for chocolate, why...you'd love this cookie. =) It's straight from Martha Stewart's Collectible Cookie Edition of Everyday Food (2006) again, and available online too.

It gets a little messy to make, but that really is part of the fun, hee hee...^_^ The original recipe says it makes 18...I doubled the batch though, and got about 52 of them! O_o Perhaps I made them a little smaller than instructed...^_^ Below is the recipe for "18" snowcaps.

Ingredients:

- 4 ounces bittersweet or semi-sweet chocolate, coarsely chopped (I just used the Ghirardelli bittersweet chocolate chips and melted them)
- 1/2 cup all-purpose flour
- 1/4 cup cocoa powder
- 4 teaspoons instant espresso powder
- 1 teaspoon baking powder
- 1/8 teaspoon table salt
- 4 tablespoons (1/2 stick) unsalted butter, room temperature
- 2/3 cup packed light-brown sugar
- 1 large egg
- 1 tablespoon milk

Directions:

1. Place chocolate in a bowl, and melt in the microwave in 30 second increments; let cool. In a separate, medium bowl, sift together flour, cocoa powder, espresso powder, baking powder, and salt.

2. In a large bowl, beat butter and brown sugar until light and fluffy. Add egg and beat to combine. Stir in cooled chocolate. Add dry ingredients alternating with the milk. Mix just until combined.

3. Turn out onto a piece of plastic wrap. Shape into a flat disk; wrap in plastic and chill in freezer until firm, about 45 minutes.

4. Preheat oven to 350 degrees. Line two baking sheets with parchment paper. Pour confectioners’ sugar into a large bowl. With slightly damp hands, shape dough into 1-inch balls (about 1 tablespoon of dough each). Roll each ball in powdered sugar. Leave in sugar while shaping remaining cookies. Roll cookies a second time to completely coat.

5. Place on prepared baking sheets 2 inches apart. Bake until sugar coating splits, and cookies have spread but are still soft to the touch, 12 to 14 minutes (my oven = 11 minutes). Transfer to a wire rack to cool.

Saturday, December 26, 2009

organic produce

As today's public service announcement, here's information from Dr. Mercola. It's expensive to eat organic, and even though that's my real desire (so many darn toxins in life in New Orleans, don't need to eat them) I can't always do so. So, this helps me make the determination of what's most important to get organic. The first chart - things that are least important to buy organic (though, the picture is broader than just pesticide load: there are some serious human rights violations especially with conventional banana production); second chart - things you really should.

Of course this all gets complicated because the overwhelming majority of vendors at the farmers market do not grow organic. It's far more difficult to do that it here in the South than other places (as my own experience - and research - has shown). So when faced with local or organic choice, it's always a tightrope walk for me. I avoid the Georgia peaches because they laughed at me when I asked if they spray them, and I avoid the fellow who says, "Pesticides are the least of your worries - I grow one mile downstream from a nuclear power plant! Why do you think everything looks so good and big?!" I talk to the apple man about which sprays he applies and when, and I hit strawberry season early (and freeze a bunch), before they spray.

I wash produce well - especially those on the high pesticide load chart - and consider peeling when conventional.

Sigh. Eating well is complicated!

The following 12 foods have the lowest pesticide load when conventionally grown. Consequently, they are the safest conventionally grown crops to consume:
Broccoli Eggplant Cabbage Banana
Kiwi Asparagus Sweet peas Mango
Pineapple Sweet corn Avocado Onion

Meanwhile, these 12 fruits and vegetables had the highest pesticide load, making them the most important to buy or grow organic:

Peaches Apples Sweet bell peppers Celery
Nectarines Strawberries Cherries Lettuce
Grapes (imported) Pears Spinach Potatoes

Friday, December 25, 2009

Zucchini Latkes


Zucchini Latkes
Originally uploaded by gummychild
With lots of sweet baking going on, it's nice to balance it with something that's a little savory...^_^ I made these Zucchini Latkes today for lunch, to go with leftover pizza that Mello brought over on Wednesday. ^_^

I love making potato pancakes, but this new discovery is a new species of its own! It's very, very light, and extremely tasty. ^_^ The outside is just a bit crispy, and the inside is moist (I did not squeeze out the water from the zucchini as indicated in the original, because I didn't want just crispy zucchini cakes) and full of zucchini flavor - perfect if you love zucchini as much as I do. =)

The only problem is, I modified this quite a bit from the original at gourmet.com, and went on my own, eyeballing the amounts of ingredients I used, so I'll do my best to give you the best estimate in terms of measurements.

Ingredients:

- 3 regular size zucchinis, peeled and shredded with a grater.
- a pinch of kosher salt
- 1 egg
- 1/2 Cup of panko bread crumbs
- 1 Tablespoon of parmesan cheese with tuscan herbs (dried basil, thyme, etc...)
- Oil to pan cook with

Directions:

1) Mix everything together well. =) Season to taste.

2) Make one circle of oil on a hot skillet, and wait for the oil to heat up.

3) Drop mixture in by giant spoonfuls (I used a serving spoon; I'm guessing it's about 2-3 Tablespoons) but make sure they are packed together into a latke/thick pancake shape so that it will cook and hold together.

4) When the bottom is browned, flip carefully and wait for the other side to brown.

5) Serve fresh! It's light, tasty, and doesn't need additional seasoning. The original suggests sour cream, but I liked it just as it is. =)

fennel, feta, kalamata salad

Super duper yummy! Inspiration here.

Dressing:
  • 1/4 c lemon juice (fresh-squeezed Meyers lemons, please)
  • sugar to taste (about 1 tsp)
  • salt & pepper (go light on salt because of olives and feta - how salty are they?)
  • 1 tsp - 1 T olive oil
Mix together & set aside.

Salad:
  • fennel (I used one bulb sliced as thinly as I could, but I need a mandoline!) - set in ice water while preparing everything else
  • romaine or other lettuce you have on hand (or none)
  • olives (kalamatas, about 1/3 cup because they're yummy!); I prefer them chopped in 1/4 or so
  • 4 oz of feta (fresh goat feta, please!)
Mix the dressing in with the ingredients and enjoy!

Hague Cookies =)

Mr. Hague makes these gigantic cookies regularly for our staff at Sierra, and he shared the recipe with me years ago. =) Though they're still very, VERY good and the ONLY chocolate chip cookies I ever make (I know it sounds snooty, but really...I've not had another chocolate chip cookies better than these! ^_^), they're always better when Mr. Hague makes them, just because. ^_^

They're not the most photogenic, aesthetically beautiful cookies, but they're probably one of the best tasting. You simply can't beat that rustic, homemade cookie taste. ^_^

Ingredients:
- 3/4 Cup white sugar
- 3/4 Cup packed brown sugar
- 1 Cup of butter, softened
- 1 egg
- 2.25 Cups flour (AP or whole wheat flour)
- 1 tsp. baking soda
- 1/2 tsp. salt
- 1 cup of coarsely chopped nuts (pecans for me)
- 12 ounces (or 2 cups) of semisweet chocolate chips (I use bittersweet Ghirardelli because I'm a dark chocolate girl...)

Directions:

1) Heat oven to 375 degrees F, and line a baking sheet with parchment paper.

2) Mix the sugars, butter, and egg in a large bowl well.

3) Add in the flour, baking soda, and salt (dough will be stiff). Stir in nuts and chocolate chips.

4) Drop dough by rounded tablespoonfuls (or, if you're Mr. Hague, rounded palmfuls, hee hee...), about 2 inches apart onto the baking sheet.

5) Bake 8-10 minutes (I find 8 minutes is fine for my oven; as the oven stays on for each batch, by the 3rd batch, I usually go down to 7 minutes) or until light brown.

6) Cool slightly, and then remove from the cookie sheet. I like to put them up on a wire rack to cool completely before storing them in an airtight container, but you can also eat them at this point, hee hee hee...^_^

Wednesday, December 23, 2009

apple phyllo pastry


My fennel-kale phyllo pastries are wonderful, but the phyllo was larger than the space I planned for it to sit so it got pretty beat up and I want to use it up.

So, what to do with phyllo? Well, I do have apples and dried cranberries I've been wanting to use up ...

****
  • apples, chopped (2 large ones was all I had but more would be good)
  • dried cranberries, soaked in rum or bourbon for a couple of hours or overnight (1/4 c)
  • pecans or almonds, chopped or sliced (1/2 c)
  • sugar (to taste - I used 2 T brown sugar)
  • cinnamon (I like a LOT of cinnamon, so about 1-2 T; nutmeg is also good but I'm not a real fan)
  • lemon juice (Meyer's lemon juice, about 1 T)
  • dash salt
Mix together and simmer on the stovetop until apples soften a bit - about 10-15 minutes. (Adding cornstarch w/water to thicken it would be a good step but I just was so not in the mood for Argo.)

Melt 2-3 T butter w/2 T honey. Lay out a sheet of phyllo and lightly brush it with butter/honey; add another sheet and repeat. I had 10 sheets of phyllo to use up, but about 5 would be good or anything in between.

Put filling on phyllo and roll up like a jelly roll - or put on parchment and tuck up (like picture above) and bake at 350 for 30-45 minutes, until phyllo is browned.

***
The melted butter makes it not really low fat, but it's so much better than a pie crust. This would be great with whipped cream or vanilla ice cream!

Tuesday, December 22, 2009

phyllo with greens & cheese

I have some ingredients to use up, and what brings things together better than (organic) phyllo dough? Me = very excited. I used to make a chard phyllo thing when my garden was overabundant. I remember a roommate coming home and sniffing, "I don't eat anything green," and I remember they were very tasty - but beyond that, not so much.

****
  • kale - I have quite a bit left, so I will boil it down and chop it up finely.
  • spinach - frozen, thawed. Note, other greens such as chard and beet greens would be phenomenal.
  • fennel greens, chopped up
  • onion (1)
  • garlic (2 cloves)
  • ricotta - leftover from bruschette adventures, I was wondering what to do with it (4-6 oz)
  • feta - picked up today, I'll use some for a good flavor (4 oz)
  • 1 egg
  • 1/2 tsp nutmeg - really, just a little bit
  • salt and pepper (other things as desired such as lemon juice, mint, other spices, etc.)
  • phyllo
Sweat onion and garlic to soften. Either cook the greens with that or boil greens separately & then drain/chop and then add in. Add fennel greens. Do drain the greens well or it'll be too soupy.

Add the rest of the ingredients (except phyllo) and mix it up. Taste it and see if anything is missing, adjust, etc.

Let it cool (or prepare the day before). The phyllo should thaw in the refrigerator overnight.

There are many tutorials on-line about how to use phyllo dough; I don't remember it ever being a hassle so I just follow the directions on the box. Lay it out, brush some olive oil, cut it in strips, make it triangles. I like a lot of filling and not much phyllo - probably because I've never had the pleasure of fresh phyllo.

Bake at about 350 degrees for about 25 minutes. Also freeze well to be baked later!

***

Phyllo is fun, and if I have any left over I will do some little things with apple, thyme, and pecorino cheese. Yum! You can stuff anything in it and enjoy.

Saturday, December 19, 2009

hummus

I apologize to anybody wanting directions to make hummus - I don't measure. I taste, and because I've made hummus dozens of times I eyeball. There are myriad recipes and they're all pretty similar but with different measurements, and you just have to try it and see what you like best.
  • garbanzo beans. I always soak and cook them myself - not only is that cheaper than cans (and create less waste), but their texture is better because I cook them for a long time. Garbanzos don't overcook though - and I tell you this after cooking some for about 9 hours today. I soak them overnight and then cook them in the slow cooker - high if I'm home, low if not (with plenty of water). I do love the smell! I make a whole crockpot full because I might as well if I'm using the electricity, and I make a TON of hummus and freeze it in containers to have for months until the next batch.
  • lemon juice (fresh is best)
  • sesame tahini (when what I have is gone, I'm going to try to make my own)
  • olive oil
These are the key ingredients to get texture and taste right. I like to grind in a food processor and then a blender - this gets it very smooth. It's a bit of work, especially when I make 4 quarts of garbanzos and have to do a few batches. But again, now I won't have to make hummus again for months.

Other things to add to taste:
  • green onions
  • garlic (I always put in a TON of garlic, and since I usually eat pita & hummus for breakfast, it can have a little bite - so this time I tried cooking cloves & green onions in with the garbanzos) (Know too that the garlic flavor ripens - it may taste bland, but after sitting for awhile the garlic will be like WOWZA! - so be gentle)
  • cumin
  • salt
  • roasted peppers (I really like roasted anaheim peppers, and a lot of them, but last time when I did a taste test with friends I heard more favorable results with roasted red peppers)
  • Whatever your heart desires! (sundried tomatoes, chipotle, cilantro, pepper, paprika, cayenne, parsley ...)
When you serve it, it's nice to have some whole garbanzos to scatter, then a sprinkle of paprika and a glug of olive oil.

***
I have a hard time with breakfast foods, and pita & hummus is a perfect one for me so I freeze up batches of hummus and a dozen pita at a time. Hummus can be pretty darned expensive in its own tubs at the store so you can really save money by making your own - plus then you can make it just how you want it, and awe and amaze your friends if you accompany it with homemade pita bread. Nobody dislikes the woman who brings the homemade bread.

roasted sweet potatoes with thyme


(I apologize that I'm a horrible photographer.)

Taken from here, with some modifications.

  • 3-4 medium sweet potatoes, peeled and cut into 1"-1 1/2" thick rounds
  • 2-3 tablespoons melted butter (or olive oil, but butter & sweet potatoes is a match made in heaven!)
  • 1/2 - 1 tablespoon fresh thyme leaves, chopped
  • 2 small cloves garlic, minced
  • 1/4 teaspoon crushed red-pepper flakes
  • 1 teaspoon coarse salt
Mix it all together. Lay out rounds single layer on a pan and cook at about 400 degrees for about 40 minutes.

roasted cauliflower


It's cauliflower season again - YAY!!

Taking the idea from here, roasted cauliflower with cumin is one of my very favorites. Amy just facebooked me yesterday asking again how to make it - I love sharing with friends!

I think this is a wonderful side with just about anything, especially Indian food.

****
  • cauliflower - 1/2 - 1 head, broken into florets

Mix it with (quantities depend on how much cauliflower):
  • good glug or two of olive oil
  • salt (not too much)
  • cumin (I put in quite a lot)
  • cayenne pepper (not much)

Mix it all up and then put single layer on a pan.

Roast at about 400 degrees for about 40 minutes (flipping midway). I like mine really well done. Unfortunately it shrinks so much, but alas. And truth be told, no matter how much I make there are rarely leftovers. I have been known to stand at the oven and just eat the entire head of cauliflower - it's THAT GOOD. And cauliflower is super good for me, as is cumin.

Lemon Pecan Cookies with Lemon Glaze

I didn't looove how these came out, but they weren't too bad, and others might have liked it more. The recipe came from Henry's Market, which is where I get the recipe for that very tasty Citrus Salt that the Chris H. loves, hee hee...=)

Ingredients:

- 1/3 c. powdered sugar
- 1/3 c. butter, room temperature
- 1 Large Egg
- 2/3 c. honey
- 1 tsp. vanilla
- 2 Tbsp. lemon zest
- Juice of one lemon
- 2 1/2 Cups all-purpose flour, plus extra for rolling
- 1 tsp. baking soda
- 1/2 tsp. salt
- 1/3 c. finely chopped walnuts (*I used pecans)

For the Glaze:
- 2 c. confectioners’ sugar
- 3 Tbsp. lemon juice
- 2 tsp. lemon zest

Directions:

1. Preheat oven to 375° F.

2. Cream together sugar and butter at low speed. Add egg, honey, vanilla, lemon zest, lemon juice. Mix until smooth.

3. Sift together flour with baking soda and salt. Mix flour mixture into margarine mixture, until just combined. Fold in walnuts.

4. Dust work surface lightly with flour. Roll dough into an 1/8-inch thick rectangle. Using cookie cutters of choice, (I just used a cookie dough scoop, and didn't shape them), cut out cookies and place on a parchment paper-lined baking sheet, about 1-inch apart.

5. Bake 8 to 10 minutes, until lightly browned. Cool on a cooling rack for 10 minutes.

6. While the cookies cool, mix together 2 cups confectioners’ sugar with lemon juice and lemon zest to create a spreadable glaze. Spread glaze over cookies and top with lemon zest, or chopped nuts.

Lemony White Chocolate Chunk Biscotti

I've been playing and experimenting in the kitchen again...hooray! ^_^

This is one of my recent creations...

Even BatNomi would be proud of me, because these came out pretty dang tasty! =) And they were the first time I've ever made biscottis before...=)

Granted, they're not photogenic, but they are wonderful in taste! =)

Modified slightly from KraftFoods.

Ingredients:
- 2 cups flour
- 1 tsp. Baking Powder
- 1/2 tsp. salt
- 1/4 cup (1/2 stick) butter, softened
- 1 cup sugar
- 2 Tbsp. grated lemon zest
- 2 eggs
- 1 tsp. lemon extract
- 4 ounces of White Chocolate chips
- 1/3 cup Sliced Almonds, toasted

Directions:

1. HEAT oven to 350ºF.

2. SIFT together flour, baking powder and salt; set aside.

3. Beat butter, sugar and lemon zest in separate large bowl with mixer until well blended. Add eggs, 1 at a time, beating well after each. Blend in extract. Gradually beat in flour mixture. Stir in chocolate and nuts.

4. DIVIDE dough in half; shape each half into 12x1-inch log on floured surface. Place on greased baking sheet.

5. BAKE 20 min. or until golden brown. Cool on baking sheet 10 min.

6. Transfer to cutting board. Cut each log diagonally into 21 slices, using serrated knife. Return, cut-sides down, to baking sheet. Bake 5 min. or until crisp. Remove to wire racks; cool completely.

Toffee Blondies


Toffee Blondies
Originally uploaded by gummychild
Oh my. Shelton LOVES these. =)

They're kinda like brownies, but not made with chocolate at all, so they're called "blondies".

The recipe comes from Martha Stewart's Everyday Food's Collectible Cookie Edition (2006)...a little cookie recipe book that I love and clutch onto. I've made many, many cookies from this book, including yummy Butter Pecan Cookies, Chocolate Espresso Snowcaps, Coconut Balls, Icebox Shortbread Cookies, and so forth. =) It's probably where most of my favorite cookie recipes come from. ^_^

So here's how you too can make these yummy Toffee Blondies!

Ingredients:

- 8 Tbsp (1 stick) of unsalted butter, melted
- 1 Cup packed light brown sugar
- 2 large eggs
- 1 tsp vanilla extract
- 1/4 tsp. salt
- 1.5 Cups of AP Flour
- 1 Cup of Toffee Candy Bits/Almond Brickle Bits. =)

Directions:

1. Preheat oven to 350 degrees F. Meanwhile, line the bottom and sides of an 8"x8" square baking pan with parchment, leaving a 2 inch overhang on both sides. Set the pan aside.

2. Beat butter and brown sugar until light and fluffy. Beat in eggs, vanilla and salt well. Add in flour and beat until just combined.

3. Fold in the toffee bits.

4. Spread the batter evenly in the baking pan and bake for about 30 - 35 minutes, when the toothpick comes out clean. Remove from the oven and cool completely on a wire rack..

5. Using the parchment overhang, lift the cake from the pan and peel off and discard the parchment. With a serrated knife, cut into desired size and be ready to serve! =)

*The original recipe uses foil, and an electric beater. Unless I have to, I usually always use parchment paper, and mix things by hand with the whisk that comes with an electric better, ha ha, or a spatula. =)

Monday, December 14, 2009

birthday cake

Yellow cake recipe from here was pretty good, and chocolate frosting from here was outstanding!

roasted chicken & vegetables

Oh, YUM! The chicken was sooo moist and juicy and the vegetables fantastic as well.

***
Prep vegetables. This is the mixture I used but it could totally be altered:

*10 small potatoes, de-eyed and chopped in half
*3 carrots, chopped in rounds
*1/3 head cauliflower, in florets
*1/2 onion in big chunks
(sweet potatoes would be good, but I wouldn't recommend beets unless you want pink chicken)

I tossed all that with about 1 T of olive oil and a dash of cumin & salt & pepper. Lay it out in a 9x13 pan (or equivalent).

On top of that put a washed chicken. I put it breast side up first. Rub about 2 T kosher salt and some pepper into the skin with 2 T or so of olive oil. I also rubbed some garlic and then threw the cloves in the body cavity.

Lay the chicken on top and bake at 425 for 45 minutes.

At that time, mix up the vegetables and pour the chicken juices from the cavity onto the vegetables. Put the chicken its other side and bake another 30 or so minutes at 350 degrees - you want the temperature in the chicken to be about 170 degrees (use a thermometer).

Let it sit about 15 minutes before carving and then enjoy - and shock and awe your friends! :)

roasted beets and sweet potatoes


from here ... so good!!
  • 4-6 medium beets, peeled and cut into chunks
  • 2 1/2 tablespoons olive oil, divided
  • 2 (or so) cloves of garlic
  • 1 teaspoon kosher salt
  • 1 teaspoon ground black pepper
  • 1 teaspoon brown sugar
  • 3 medium sweet potatoes, cut into chunks
  • 1/2 - 1 large (sweet) onion, chopped (needn't be sweet)

Directions

  1. Preheat oven to 400 degrees F (200 degrees C).
  2. In a bowl, toss the beets with 1/2 tablespoon olive oil to coat. Spread in a single layer on a baking sheet.
  3. Mix the remaining 2 tablespoons olive oil, garlic, salt, pepper, and sugar into the sweet potatoes and onion, coating well.
  4. Bake beets 15-30 minutes in the preheated oven (20 minutes was insufficient). Mix sweet potato mixture with the beets on the baking sheet. Continue baking 45 minutes, stirring after 20 minutes, until all vegetables are tender.
***
This is super yummy and really hit the spot. The trick is to get fresh, local produce and let it stand on its own.

By the time the beets were no longer too crunchy, the sweet potatoes were too soft - so I'd cook the beets longer alone or chop even smaller.

Also, I cooked this in an oven that was 425 for 1/2 hour and then 350 degrees - I don't think temperature really matters and you can roast them at any temperature.

Saturday, December 12, 2009

Russian-style beet potato salad


From Laurel's kitchen

2 (or so) medium beets, boiled and then skinned and diced
2 (or so) potatoes, chopped and boiled
1/2 c peas

Cook and chill all.

Then add sauce:
1-2 T mayonnaise
4-6 T yogurt
1-2 T vinegar
salt & pepper & sugar to taste
fresh dill if you have it
****
This craves my root vegetable cravings! I flash back to memories in Russia, where this was common summer fare. I like to let it sit for a bit before consuming to let the flavors meld.

It makes a very pretty pink salad that is oh so tasty!

oh what a beautiful morning!


All the makings of a crappy day: Cold. Rain. Ate cookies for breakfast from last night's cookie exchange.

And yet, the charms of New Orleans are too seductive for that miserable nonsense. I started at the Farmers Market and it was amazing. I got strawberries from Pontchatoula. Strawberries in DECEMBER! I love Louisiana! And tomatoes (he grows in the greenhouse and promised me they would thrill me beyond all reason). And acorn squash and romaine lettuce and could have gotten beautiful carrots and beets but I was already set. Milk from Smith Creamery ("Would you like a taste of chocolate milk?" Trust me - it's sooooo good.) Cilantro and sweet potatoes and cauliflower. Satsumas and goat ricotta and eggs. Bell peppers and I begged the man to come back next week with his beautiful fennel because I simply couldn't face that challenge on top of everything else I got.

Oh, I just smelled the tomatoes and I think I orgasmed. Breathe deeply and enjoy the bounty. When he said something about "refrigerator" and I said, "You said I should put them in the refrigerator?" he almost snapped and confiscated them from my possession. Soul, no. Never, ever put tomatoes in the refrigerator. And I was thinking of something lovely with the strawberries for Monday dinner but they will not last that long because they are so aromatic and inviting.

Then I went to La Boulangerie and picked up a couple of baguettes for bruschette (or probably crostini since they're narrow). They have such wonderful baked goods and staff with French accents.

Then on to Whole Foods where I appreciate the attempted help of the staff but they don't know anything compared to the customers. In the wine aisle, a woman had six children with her and they appeared to not all be hers because the girls (all under twelve) were sipping from hot liquids and discussing the relative merits of different brands of wine that they have tried. And checking out, a woman had a small bundle of thyme for cheap which I hadn't seen so she pointed me in the right direction. Because of the dash I didn't have time to ask her what she was doing with 8 pounds of beets. Bummer.

You know how when you're madly deeply in love and seeing that person makes your heart flutter and stomach flip? That's how I feel about New Orleans.

Friday, December 11, 2009

Russian tea cakes

A Christmas classic! I've since heard these powdered sugar-covered shortcakes called other things such as Mexican wedding cakes, and they're probably completely unknown in all foreign lands. But since I grew up in the capital of Russian America, I get to call them Russian tea cakes!

There are many recipes for it but they all are only slightly different. Here's one.

And here's the one I have in my recipe box (makes about 3 dozen):

1 c unsalted butter, softened (you need to let it sit out for hours - don't microwave or other shortcut!)
1/4 c powdered sugar (sift if necessary)
1 tsp vanilla
2 c flour + 2 Tbsp
1/4 tsp salt
3/4 - 1 c chopped toasted walnuts or pecans.

Toast the nuts on an ungreased baking pan for about 8-10 minutes at about 350 degrees (until they smell toasted). Set aside until they cool. Then if you're using a food processor, toss them in with 2 T flour and pulse just about 5 times. Too much and you get nut butter which is not what we want here! (If you're not using a food processor, just chop them finely and add in the 2 T flour with them.)

Mix powdered sugar well into butter (beat for awhile - until butter looks whipped) and add in vanilla. Add salt and 2 c flour (gradually is easier) and stir well (this is when I start using my hands instead of a spoon). Add the nuts and mix well.

Roll into small balls (about 1 1/2" diameter) and bake 10-12 minutes in an oven about 375 (between 350 and 400 is fine). They're done when they start to brown on the edges and smell done.

Roll the warm cookies in powdered sugar; let cool and then roll them again.

Thursday, December 10, 2009

three bruschette

The farmers market and an early dinner guest inspired this research on bruschetta. All need to made just before serving and eaten immediately - otherwise the bread will be a soggy mess.

****

WINTER SQUASH BRUSCHETTA from here (I followed his directions but would change in the future)

(makes about 16 pieces)

1 1/2-lb butternut or acorn squash, peeled, de-seeded and chopped to a ½-inch dice (it wasn't easy peeling the acorn squash but it wasn't impossible)
½ multigrain or whole wheat baguette, sliced to 16 ½-inch rounds
3 tablespoons extra-virgin olive oil
½ cup fresh ricotta (goat cheese would be way better)
juice of 1/2 lemon
salt and pepper
few pinches rosemary (optional) (necessary, and three big sprigs of fresh)

Preheat oven to 375 degrees. Toss diced squash pieces in two tablespoons of the oil and optional rosemary and spread in a single layer on a baking sheet. Bake for 20-30 minutes (or longer - more like about 50 minutes), rotating or flipping them once midway through cooking. Pieces should be caramelized and crispy in parts but not too crisp. Remove from heat and let cool completely.

Line the bread slices in an even layer on a baking tray and bake at 250 degrees for about 5 minutes, until just crisp (or a toaster oven). Remove from tray and let cool completely. (If desired, rub a garlic clove on the bread for a little kick.)

Spread a layer of ricotta on each piece of bread. Sprinkle a little salt and pepper on top of each one, then place a spoonful of the squash on top. Squirt a few drops fresh lemon juice on top of each piece. Drizzle the remaining tablespoon of olive oil across the tops (I skipped), and serve immediately.

I found it rather bland and I'm hoping a day in the fridge will deepen its flavor. I think it would be great with a chevre rather than the uber-bland ricotta, and maybe some sweetness in the squash to deepen its flavor.

***********

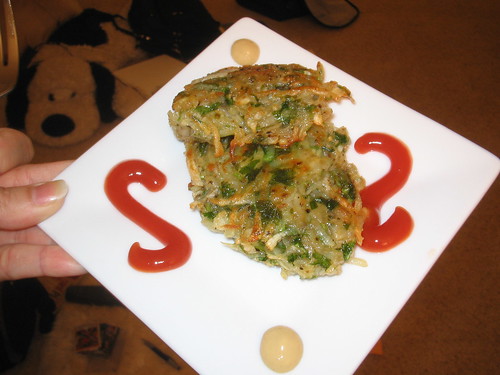
BEET GREEN BRUSCHETTA inspired by here and here.

  • 2 cloves (or so) garlic, minced
  • beet greens, chopped (I used the tops of about 8 beets)
  • salt & pepper to taste (go light on the salt)
  • 1/2 tsp red chili flakes
  • 1 1/2 T sundried tomatoes, minced
  • cheese such as Pecorino

Crisp up the bread (I cut at a diagonal, about 1/2-3/4" slices - this would be good on larger bread slices) in a toaster over broiling for about 4 minutes. You don't want to turn it into Melba toast though, so more is not really more.

Heat oil on low and gently saute garlic for a couple of minutes. Then add in the chopped beet greens (no need to dry - the liquid helps them cook) and salt, pepper, and chili flakes. Stir while cooking over low heat, then put a lid on for a few minutes to let the greens cook. Remove from heat and stir in sundried tomatoes.

Top the bread with the beet green mixture and shave a bit of cheese on top. Return to oven/toaster oven for about 2 minutes just to barely melt up the cheese.

****

TOMATO-BASIL BRUSCHETTA, the old standby

  • 1 garden-fresh tomato (or more!), chopped and deseeded/liquid removed if there's too much
  • fresh basil (about 5-6 medium leaves), minced finely
  • salt, pepper to taste
  • 1 T olive oil (or as desired)
  • a dash of vinegar or lemon juice.

Mix up and let flavors meld for an hour or so.

Crisp up the bread. Rub garlic along the bread but NOT too much (I was so zealous I can guarantee no vampires will be near me anytime soon). Top with tomato mixture just before serving.

Wednesday, December 9, 2009

preserved lemons

Meyers lemons only come around once a year, and at the farmers market they call to me so seductively. They're sweet and floral and so yummy - but when I end up with dozens, what am I to do? (though I dreamily do fantasize about the day when I have my own home with my own fruit orchard with at least a couple lemon trees)

First I juice a bunch and freeze in ice cube trays (each cube is about 2 T) - I'm very happy to have fresh-tasting lemon juice throughout the year.

I take the peels of these lemons and freeze them. My thinking is that I could just zest them as needed since they're frozen basically intact. I haven't tried it yet, but it's a to-do and I think it would work fine.

But the OTHER THING - and the purpose of this post - is PRESERVED LEMONS.

Last year I did some internet searching when my lemons were starting to turn and I learned for the first time of these. They're used heavily in Moroccan and Algerian cooking, and so I was game. I made a quart which I have very happily used throughout the year. They taste, I'm told, like capers - however, I really don't like capers but I really liked preserved lemons, so there's a limitation to that theory. But they are pickled and not sweet or sour, and taste extremely different than when fresh.

I got advice from several sources, including here. I just made some more today - two pints, and in the second pint I added a bay leaf, a few cardamom pods, a few pepper corns, a cinnamon stick, and a couple cloves. I thought it would be a fun try but I didn't want a full quart of the seasoned ones.

****
Wash some lemons thoroughly (organic is best!). I needed about 3 1/2 lemons for pints and about 8 for a quart - depending on the size.

Put 2 T kosher or sea salt in the bottom of a sterilized jar.

Cut the lemon as if you were going to cut in half through the top, but stop before you actually cut through. Then do the same so it is almost quartered but still attached at the bottom.

Salt heavily inside and outside the lemon.

Squeeze it into the jar - you want juice to come out. (You do NOT, however, want to lemon juice to shoot up all through your kitchen as though a blue whale's blow hole is in your lemons. You know, like I did today. Twice.)

Fill the jar, cramming them in tight, making sure there's lemon juice covering the top (either from these lemons or from extra juice).

I like to cap with the plastic lids Ball makes - the metal will corrode.

Leave the jar out for a few days and turn it upside down every so often. More juice should come from the lemons, but if the lemons aren't covered you can add more juice.

The texture and appearance of the rind will start to change - it's pickling - and after a few days you can put in the fridge. I'm told to not use for a few weeks to allow the process to complete.

It should be fine to keep the jars in the fridge for a year or so - I just make sure there's always lemon juice covering the lemons.

***
TO USE:

I use in recipes calling for them (I'll post some later). Take a lemon out, or use just a half, and remove the pulp. Rinse off the salt and then chop it very finely and add in. I think I read somewhere it can get bitter if cooked a long time, so I add near the end.

Preserved lemons have such a unique flavor and couldn't be substituted with anything else - and since I'm a fan of northern African cuisine, they've been a great discovery for me!

Tuesday, December 8, 2009

roasted chicken & vegetables

Now this just looks darned good - will have to try it soon!

I like carrots and potatoes roasted with the chicken, and I'd like cauliflower ... I wonder if beets would bleed too much? Hmmmm ...

citrus spinach salad

This is always a hit - I love the different tastes and how healthy, yet satisfying and tasty it is!

Citrus Spinach Salad

2 cups fresh spinach leaves
OR
2 cups torn Romaine Lettuce
1/2 small red onion, thinly sliced (go light)
1 fresh navel orange, peeled and separated into sections
OR
2 blood oranges, peeled and separated into sections
OR
1/2 small can mandarin oranges
2 T toasted pine nuts

Dressing
2 T orange juice
2 T white wine vinegar
3 T olive oil (usually I use less)
2 tsp. honey (or save the juice from the can of mandarins for sweetener)
1 T chopped fresh cilantro
2 tsp. dijon mustard
salt & pepper to taste

Serves 2

Toss spinach, onion, oranges and pine nuts together. Whisk together all dressing ingredients. Pour over salad and serve.

(Note: I would double or treble the salad fixins for that amount of dressing)

Tuesday, December 1, 2009

pita

Here's the recipe I used from my bread cookbook. It's not the greatest, but it works.

2 T dry yeast
2 T sugar (or honey)
2 tsp salt
2 C whole wheat flour
2.5 c very warm water (up to 120 degrees if it's cold in the kitchen)
1/4 c oil or melted butter
another 2 c whole wheat flour
1 cup+ white flour

Make bread with it (put yeast, sugar, salt & some flour together, then add the oil & water to form a sponge [just to make sure the yeast is working well], mix in the rest of the flour, knead, etc.). Let it rise for about an hour (double in bulk). Then divide into 16 pieces and heat the oven to 475 degrees (letting them rest as oven heats).

Roll into rounds (about 3/16" thick, about 6" round) and put on baking sheets sprinkled with corn meal (corn meal only underneath the bread, or it'll burn, smoke, and start the smoke detector). Alternatively, put on parchment paper. I just made a batch (12/24/09) and half of them stuck badly to the pan, which was a real bummer.

Bake about 8 minutes.

They freeze well and are great with hummus! Hm ... and falafel sounds good ...