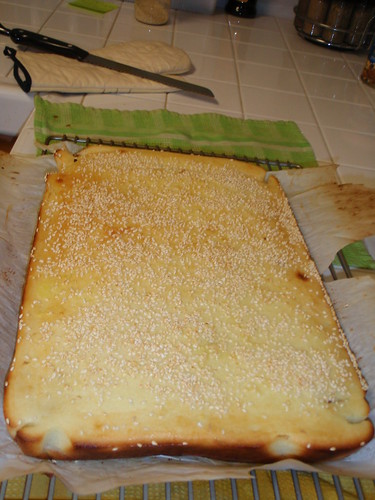
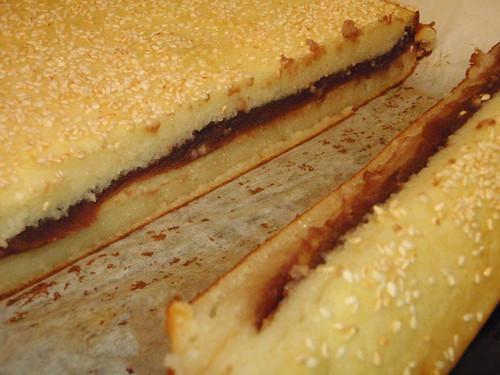
Mmm...my Auntie #4, one of the great cooks I know besides my mom, told me how to make the cake from memory, so I did my best to try it out today, since I had all the ingredients at home. It came out deeeelicious! Because it's made mostly of mochi, it's got this tasty, chewy texture on the inside; the outer crust, because it's baked, is sweet and cakey. And, you can never go wrong with red bean filling, of course. =) I think she made the red bean mixture on her own, but I cheated since I had a can of sweetened red (azuki) beans in the pantry. ^_^
You'll Need:
-1 pound of Sweet Mochi Flour (I use Mochiko)
-1 Tablespoon of Baking Powder
-1 Cup White Sugar, or 2 Cups of Brown Sugar (I used the white sugar, as it was handy, but the brown sugar is what she used, and it makes the cake more brown colored...which I kinda preferred. Brown sugar for me next time!)
-2.5 Cups of Milk
-3/4 Cup of Vegetable Oil
-4 Eggs
-1 Can (18 oz) of Sweetened Azuki Red Beans
-1 egg, beaten, to brush on top of cake
-Sesame seeds to sprinkle (I use toasted ones; next time, I'll get some of the black ones and have a mix of white and black sesame seeds on top!)
*She said that one can always reduce the sugar, so if you're avoiding too much sugar, you may want to go that route.
Directions:
- Preheat the oven to 375 degrees F.
1) Mix everything together, except for the last three ingredients. If you want a fluffier merengue-ier cake, you may want to beat the egg whites separately until stiff, and fold them in.
2) Pour half of the mixture into a 9" x 13" pan, lined with parchment paper or foil.
3) Bake for 20 minutes.
4) Take the cake out and spread all the red beans evenly on top, and then pour the rest of the mixture on top of everything.
5) Bake 15 minutes. Brush the egg wash on top, and sprinkle generously with sesame seeds.
6) Bake another 5 minutes or so, and remove. Let it cool on a rack.
Though tasty, chewy, and warm from the oven, it's just as good, if not better, after you let it cool to room temperature. =) Easy to make, and easy to eat...^_~
yummmmmyyyyyy!!!!
ReplyDelete