Showing posts with label Chinese. Show all posts

Thursday, February 11, 2010

Chinese Red Date Tea


Chinese Red Date Tea
Originally uploaded by gummychild
After delivery, I was told to drink this as if I was drinking water...and I loved it! It was a tea brewed of dried fruits, and it's easy to make.

Ingredients:

- Toasted Rice Grains (just heat them up till fragrant on a wok)
- Dried Red Dates
- Dried Longan Fruit
- Dried Goji Berries (aka Wolfberries)
- Hot Water
- Thermos

Directions:

1. Simply toss in about a Tablespoon of the rice grains into the Thermos...and add the fruits as desired. If you want a number, about 5-6 of the red dates and longans each, with about 12 goji berries will suffice, but you can increase the number of each depending on what taste you want. If you want it to be a little sweeter (and this is sweet as in a natural kind of sweet. It's really yummy!), add some more dates or longans. =)

2. Fill the thermos with hot water and seal. Let it sit for about 10 minutes, or whenever you are ready to eat. Enjoy it hot! =)

Tuesday, January 5, 2010

Fukien Fried Rice


Fukien Fried Rice
Originally uploaded by gummychild
As you know, I love making fried rice. =) It's healthy (really, we don't need that much oil, even if it's called "fried"), depending on what you put in it, and you can use up any leftovers that are sitting in your fridge. And it's tasty. =)

Today, I decided to make the Fukien-style fried rice, which is a "wet" fried rice. You know how you can order burritos regular, or wet? Well, fried rice (and noodles, like the Chiu-Chou style stir-fried noodles!) come in the same way. Basically, you have a very basic fried rice on the bottom, and top it with the ingredients that are usually in a nice and savory gravy sauce...the sauce leaks into all the cracks of each rice grain below, filling the entire dish with flavor. ^_^

The ingredients are all eyeballed again, so I'll do my best to guesstimate measurements for those that want to try it. Keep in mind though: cooking is based on how you like certain flavors, how much you want of this or that, and is pretty flexible, so feel free to go crazy and adjust to your own liking. =)


Ingredients Ready To Go!
Ingredients:

- 3 Chicken Thighs, deboned, and with the skin and fats removed.
- 1.5 Tablespoons of cooking wine
- Grated ginger (just about a teaspoon)
- 4 cloves of garlic, minced (I wanted more garlic flavor today)
- a handful of bok choy, cleaned.
- 2 eggs, beaten.
- handful of cilantro, rinsed and chopped up.
- 1 sprig of green onion, cleaned and diced.
- 2 cups of rice (cook this beforehand)
- 2 more eggs, beaten and set aside.
- Oil to stir-fry

*Optional: You can add other veggies, such as sliced shitake mushrooms, diced carrots, and dried scallops. Those would be some nice additional touches to the ingredients I used today, but again, fried rice is pretty flexible. Do what you want. =) As for protein, adding sliced pork, beef, shrimp, and even fish fillet or meatballs (the Asian kind) would work too.

Gravy Sauce Ingredients: (all eyeballed...)

- 1 cup of water
- 2 Tbsp of starch (I use tapioca starch normally, but cornstarch works just as well for those that don't have tapioca starch)
- 1.5 Tbsp of Oyster Sauce
- 2 tsp of light soy sauce

Directions:

1. Dice the chicken thighs, and marinade with cooking wine, grated ginger, minced garlic, and starch. Set aside.

2. Chop the box choy. I like to chop the stems about half an inch wide, and the leafy parts 2-3 times bigger. Set aside.

3. Take the 2 beaten eggs and make a thin pancake on a saute pan that's over medium heat. Flip when one side is done, and when the whole thing is cooked, remove the egg and cut it into thin strips. Set aside. You won't need the saute pan anymore; everything now goes on the wok.

4. Heat up the wok on high, and add the other 2 beaten eggs slowly in a circle, so that it forms something of a thin pancake. You might just add a little more than half of the eggs at first. Add your rice, and stir-fry the eggs into the rice; add the rest of the eggs as you cook so that it mixes and mingles well with the rice. The rice should look "golden" as the eggs coat each grain. =) If you find it gets a little dry on your wok, add some oil; I usually will add a few teaspoons (one ring around the wok with my oil cruet). Remove the rice and set into your serving platter.

5. While the wok is still hot, add a ring of oil and toss in your chicken. Have fun stir-frying! When using a wok, I always prefer to "hear" the cooking - the sizzling, the metal spatula sliding against the iron wok as it confidently flips over the food pieces - it shows me that real cooking is being done! Hee hee. ^_^


6. When the chicken pieces are about 3/4ths done, go ahead and add the egg strips, cilantro, and green onions. Mix them well, and as the chicken pieces are almost done, add in the bok choy and mix well.


Step #6a...


Step #6b...

7. Make your gravy in a separate bowl, and add into the wok mixture. Adjust your gravy as needed: more water to thin it out, or starch to thicken. You won't know whether you need to thin the sauce or thicken it until you see it cook and heat up with the rest of the ingredients, as the heat helps thicken the sauce.

8. When the entire mixture is heated through (look for bubbles all over the wok!) and as thick/thin as you like, dish it all up on top of the rice, and voila! Serve hot and fresh! ^_^

Look for bubbles throughout your sauce to know that everything is heated thoroughly!


Piping hot and ready to serve!

Sunday, October 18, 2009

Red Bean Baked Mochi Cake


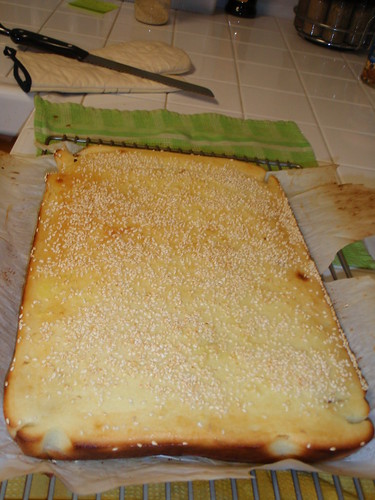
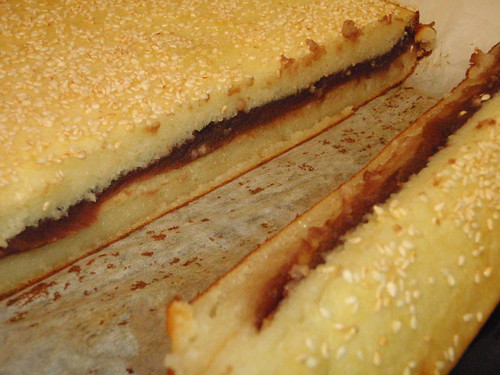
Mmm...my Auntie #4, one of the great cooks I know besides my mom, told me how to make the cake from memory, so I did my best to try it out today, since I had all the ingredients at home. It came out deeeelicious! Because it's made mostly of mochi, it's got this tasty, chewy texture on the inside; the outer crust, because it's baked, is sweet and cakey. And, you can never go wrong with red bean filling, of course. =) I think she made the red bean mixture on her own, but I cheated since I had a can of sweetened red (azuki) beans in the pantry. ^_^


You'll Need:

-1 pound of Sweet Mochi Flour (I use Mochiko)
-1 Tablespoon of Baking Powder
-1 Cup White Sugar, or 2 Cups of Brown Sugar (I used the white sugar, as it was handy, but the brown sugar is what she used, and it makes the cake more brown colored...which I kinda preferred. Brown sugar for me next time!)
-2.5 Cups of Milk
-3/4 Cup of Vegetable Oil
-4 Eggs

-1 Can (18 oz) of Sweetened Azuki Red Beans
-1 egg, beaten, to brush on top of cake
-Sesame seeds to sprinkle (I use toasted ones; next time, I'll get some of the black ones and have a mix of white and black sesame seeds on top!)

*She said that one can always reduce the sugar, so if you're avoiding too much sugar, you may want to go that route.

Directions:

- Preheat the oven to 375 degrees F.

1) Mix everything together, except for the last three ingredients. If you want a fluffier merengue-ier cake, you may want to beat the egg whites separately until stiff, and fold them in.
2) Pour half of the mixture into a 9" x 13" pan, lined with parchment paper or foil.
3) Bake for 20 minutes.
4) Take the cake out and spread all the red beans evenly on top, and then pour the rest of the mixture on top of everything.
5) Bake 15 minutes. Brush the egg wash on top, and sprinkle generously with sesame seeds.
6) Bake another 5 minutes or so, and remove. Let it cool on a rack.

Though tasty, chewy, and warm from the oven, it's just as good, if not better, after you let it cool to room temperature. =) Easy to make, and easy to eat...^_~

Thursday, July 23, 2009

Green Onion Pancakes

AKA Scallion Pancakes, or more commonly known to us Chinese folks as "Chong Yow Bang". ^_^

It's not really a pancake...think of a really thin pizza crust that's crispy on the outside, and just a little chewy on the inside, and flavored with fragrant green onions. =) So it's not really a cake, because it's dough-y, but we Chinese like to use the word "bang" (cookie) for anything that's snack/morsel-like. However, it is made in a pan, so that's part of its name. It may sound weird if you've never had it, but it's quite delicious. I don't know any Chinese person that doesn't like it. =)

I borrowed this book from the library. Pages were ripped out of it...which is sad...but it was good enough that I'm going to buy it online with a gift card I have. =) If you want to try making dim sum, I do recommend it - I've read many dim sum making books, and many are complicated or full of ingredients that are generally hard to find. This one, by far, is the best I've seen.


The recipe is from this wonderful book, and it's amazingly short and simple to make Scallion Pancakes!

Ingredients:
1.5 Cups of flour, and more for dusting
1/2 Cup of boiling water
2 Tbsp. cold water
1 Cup of thinly sliced green onions/scallions (about 6)
3 tsp. of toasted sesame oil (or 1 Tbsp shortening...I prefer the oil)
Salt
2-4 Tbsp of peanut or vegetable oil to cook

Directions:

1. Sift the flour into a large bowl, and stir in the bowling water until well blended. Then add the cold water.

2. Knead the dough on a lightly floured surface for 4-5 minutes, until the dough is firm and elastic. Form it into a ball, and dust it with flour before wrapping it in plastic and letting it rest for about 30 minutes.

3. Preheat the oven to 200 degrees F. Cover a baking sheet with a few layers of paper towels, and set it aside.

4. Divide the scallions into 6 parts. Also divide the dough into 6 pieces.

5. On a lightly floured surface, roll out one dough piece into a circle, about 7.5 inches round.

6. Use your fingers to help spread 1/2 teaspoon of sesame oil/shortening onto the dough to within 1/4 inch of the edge, and sprinkle with a scant 1/4 tsp of salt (I used less, about half of that. The first one I made seemed too salty), and top with one part of the scallions. Lightly press everything into the dough.


7. Fold the dough into thirds, and pinch to close the ends before jelly-rolling up the dough loosely on one short end.


8. Turn the coil round side up, dust a little flour on it, and flatten with your fingers, and roll it into a circle...about 5 inches in diameter, or as thick/thin as you'd want your pancake to be.


As you can see above, I need a rolling pin of some sort. Using a cup is difficult, heh heh...subsequent cakes were better rolled (this one, and the following two pictures, are of the first one made. ^_^ The previous pictures were latter cakes. ^_^)

9. Repeat steps 5-8 for all the other dough pieces.

10. Heat a nonstick skillet over medium heat, and add 1 tsp of oil to cook. When it's almost smoking, place one pancake on the skillet, and cook for 2-3 minutes per side, flipping it over only once, until golden brown and fragrant. Add another tsp of oil when you flip the pancake.


11. Lift an edge of the pancake to check for overbrowning and reduce the heat if needed.

12. Transfer pancakes to a baking sheet and keep it warm in the oven while cooking the rest; cut each pancake into 4-6 pieces when ready to serve...and serve hot and fresh! =)


Some variations you can try:
If you make your cake really thin, it's really good if you roll it up with warmed up roast beef and cilantro (lots of it, if you like it)...and then it becomes this roast beef roll...I think it's Taiwanese. I've had it a few times before with Anna, and it's REALLY good. ^_^

Instead of green onions, you can also exclusively sprinkle a ton of toasted sesame seeds for a sesame version. This pancake is often served green onion style, or sesame style!

Almond Tofu Jello


Don't get scared by the name - there's no tofu in this deliciously light and refreshing dessert! It's basically almond flavored gelatin that looks white because of its ingredients. It's one of my favorite desserts, and I eat it as it is (my brother too...who can eat bowlfuls at a time!), but it's also great on top of a giant scoop of shaved ice drenched in condensed milk. ^_^

This just so happens to be a special recipe. Most of the time, if you buy the almond jello tofu box to make at home, from a regular Chinese grocery store, it's made with a different type of gelatin, a type of agar...something that is denser in texture and chewier. The texture of this one is silky and soft, and many who've tried it say they always like this version better. I hope you will too!


Ingredients:
4 Packets of KNOX unflavored gelatin
1 Can (12 oz) of evaporated milk
1.5 Cups of sugar
4 tsp. almond extract
4 Cups of hot, boiling water
2 Cups of cold water
1 Large Can of fruit cocktail (keep the syrup!)

You'll definitely need:
1 9x13 inch glass pan

I've found this to be the perfect size, however, anything that will hold the gelatin will suffice. Glass is preferred because you'll have to slice the gelatin into blocks, and cutting up your metal bakeware is probably not ideal!

You can also make these in little cups, and serve with just a dollop of the fruit cocktail and syrup on top, like in the picture above. =) A lot of Asian restaurants will do that because it's quick and simple to portion out to their guests.


Directions:

1. Mix the cold water into the gelatin well in your glass pan.

2. Add and stir in the hot water to dissolve the gelatin crystals. Add the sugar till dissolved.

3. Add the almond extract. Stir.

4. Place in the refrigerator, and then add the evaporated milk and mix gently. Because the dish gets very full after adding the milk, it's wise to put the pan into the fridge first!

5. Refrigerate until firm, about 2-3 hours. I usually tend to make this in the morning or at night, and then check on it towards dessert time or when I get up, so it's definitely had enough time to set. It's best to make this ahead of time, as there's absolutely no loss in flavor. =)

6. Cut into square blocks, about 1-2" cubes, so it looks like tofu. =) Serve mixed with fruit cocktail in its syrup. Keeps well for the week, but well, it never lasts that long...=)